The Curtain Wall tool in Revit can do much more than glazed walls. It can be used for walls with complex patterns, special railings and even casework.
These tips should help you understand and master this awesome tool.
1- UNDERSTAND THE HIERARCHY OF CURTAIN WALLS
Curtain Walls contains most properties of a basic wall. They have bottom and top constraints and their profile can be modified. Curtain walls are different because of a few key additional features. Have a close look at the image below.

CURTAIN GRIDS
Curtain grids are division created on the walls. These division can be horizontal or vertical.
MULLIONS
Mullions are elements that can be created on each curtain grid segment, as well as on each curtain wall extremities.
CURTAIN PANELS
Curtain panels are rectangular elements located between each curtain grids.
2- PICK A CURTAIN WALL IN THE TYPE SELECTOR

Curtain Walls are created in the same way as regular walls. Select the wall tool in the architecture tab. The difference is that when selecting a type, you have to scroll down to select a wall in the Curtain Wall category. These walls have a glass icon next to them.
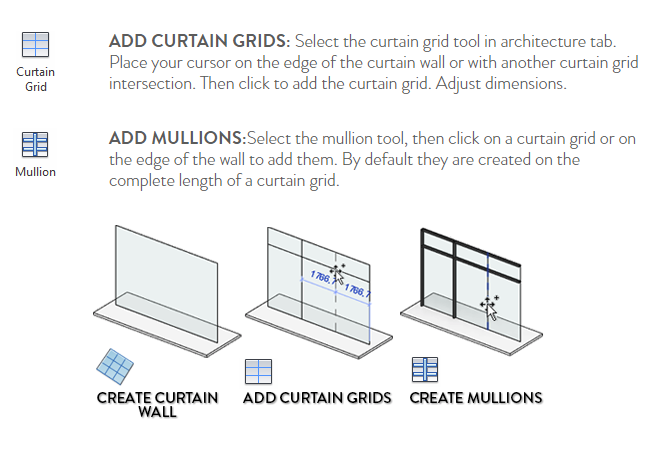
3- FILL AN EMPTY CURTAIN WALL WITH GRIDS
Use an empty curtain wall type that doesn’t use any automatic constraints or automatic mullions. Create a new wall and set all constraints. It will look like a plain glass wall. Here is how to fill it up with curtain wall elements.
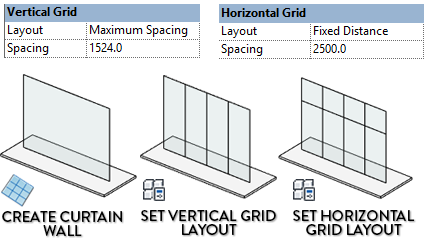
4- CREATE AN AUTOMATIC CURTAIN WALL
Most of the time you want to use an automatic curtain wall, with fixed dimensions, specific glass and mullions types. These walls are set to mimic specs from manufacters. Let’s build one from scratch.
ADD GRIDS DIMENSIONS:
Select curtain wall and click Edit Type. Set layouts and spacing for vertical and horizontal grids. Use Maximum Spacing layout to equally divide your curtain wall. Use Fixed Distanceto set a specified distance between grids, except for the filler at beggining or end.
ADD MULLIONS:
In the type properties, scroll to Vertical and Horizontal Mullions category. Add a mullion type to each category. Border 1 are left/bottom mullions, Border 2 are right/top mullions.

5- EMBED A CURTAIN WALL IN A SOLID WALL
By default, curtain walls will be embeded in a regular wall, like a window would. Moving the hosting wall will also move the curtain wall (pin curtain wall to avoid this). To deactivate default embedding, uncheck the option in the Curtain Wall type properties.

6- LEARN HOW TO CREATE A RECTANGULAR MULLION TYPE
Select a mullion, click and duplicate to create new type. Make sure Default profile is selected. Adjust both side of Width. Side 1 is left/ bottom, while Side 2 is right/top. Adjust Thickness and Offset, which is the distance from the center of the mullion to the center of the wall.

7- LEARN HOW TO CREATE A CURTAIN PANEL TYPE
Default curtain panels have 3 critical parameters to set: Thickness, Offset and Material. Offset is the distance between the center of the curtain wall and the center of the panel.

8- PRESS TAB TO CYCLE THROUGH ELEMENTS
Selecting elements in a curtain wall can be tricky, because by default a click will result in selecting the whole wall. Use tab to cycle through mullions, curtain panels and curtain grids.

9- RIGHT-CLICK MULLION FOR SELECTION OPTIONS
When you select a mullion, only segment between two curtain grids will be selected. Right-click to get more selection options like in the image below.

10- UNPIN ELEMENTS TO MODIFY THEM
By default, you can’t move or modify elements (mullions, panels, grids) in automatic curtain walls since that would break the rules set in type. Unpin the elements to make them independant.

11- MAKE CURTAIN PANEL A WALL OR AN EMPTY PANEL
The power of curtain walls is that you don’t have to only use glazed panels. In fact, you can use any wall type available in your project. You can also make the curtain panel empty.

12- SET WALL PANEL OFFSET
If you replace a curtain panel by a wall, make sure to set the offset in the instance properties, under Location Line Offset. A negative value for the offset will push the wall to the interior side.

13- REPLACE CURTAIN PANEL BY A DOOR
Curtain panels can be replaced by a door. These doors are different from regular doors: their size is dictated by the space between curtain grids. Make sure to delete the mullion below the door.

14- ADD/REMOVE CURTAIN GRIDS SEGMENTS
By default, curtain grids fill the entire length of a curtain wall. When selecting curtain grids, click on Add/Remove Segment, then click on segments to remove or add them. Mullions will be automatically deleted.

15- SET GRID JUSTIFICATION IN INSTANCE PROPERTIES
When using Fixed Distance for grids layout, set the justification in the instance properties of the curtain wall.

16- DON’T MOVE MULLIONS: MOVE THE GRIDS
This can be confusing for beginners: Mullions can’t be moved by themselves. You have to move the curtain grids to which they are attached.
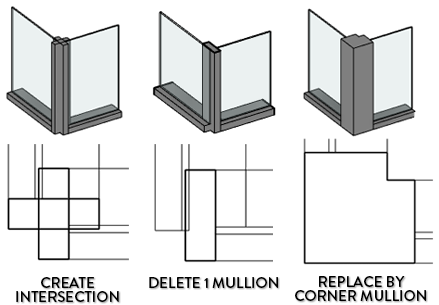
17- USE CORNER MULLIONS AT INTERSECTION
By default, regular mullions will be created at the intersection of two curtain walls. Delete vertical mullions from one of the wall and replace the other by Corner Mullions. Corner Mullion types include L-Shaped (used in the image), V-Shaped, Trapezoid, Quad Corner and Circular.
18- ARRANGE MULLION CONTINUITY
Select a mullion, you will see you the blue + icon on each extremity. Click it to change continuity on intersecting mullions.


You like how clear, easy and simple this guide was? You will love the Revit Pure BASICS package. It's a complete tutorial series to learn Revit with fun and efficiency. Download the complete Curtain Walls chapter from the series, which contains this entire blog post with additional bonus tips. Download the tutorial here.
Cover photo © Flickr