
12 Tips to Master Revit Door Families
Doors families are among the most puzzling and challenging to create. This guide is going to teach you the basic principles of door family creation. We also made a complete video tutorial just for you if you prefer.
Let’s get started.
1. Understand What to Model and What to Nest
To properly organize your Revit door family, make sure to understand which part should be modeled directly in the main door family, and which part should be loaded as a nested family. For those without programming experience: a nested family means a family inside a family. Take a look at this chart:

image © RevitPure
This is an optimal workflow for beginners and intermediate users. Model the door panel and frame directly in the main door family. Use nested families for the plan swing and for any hardware components like handles.
This technique has an exception: if you are an advanced user with a large library of panels and frames, it can be a good idea to use nested families for everything. In this advanced strategy, the main door family is only used to contain all the nested families.
2. Plan the Door you Want to Create
Before creating the family, make sure you understand what kind of door family you want to create. Here is the kind of information you need to know:
- Will you be using a steel frame or a wood frame?
- Is it a simple door or a double door?
- Do you want a trim around the door opening?
- Are you going to use the door for 3D views and renderings? If so, you will need to think about hardware families for more realism.
- Are you creating a door with a simple solid panel, or with a multiple panels and glazing?
- What dimensions to you want to be able to customize apart from the width and height of the door?
Draw a sketch of the door you need. Start to plan which parameters and reference planes you will have to create.
When you are ready, create a new door family using the standard Autodesk door family template.
3. Use Extrusion to Model Door Panels
Most door panels should be modeled using the Extrusion tool. Use the “Pick Lines” Drawing option. Go to an elevation and lock the boundary lines to the reference planes.

image © RevitPure
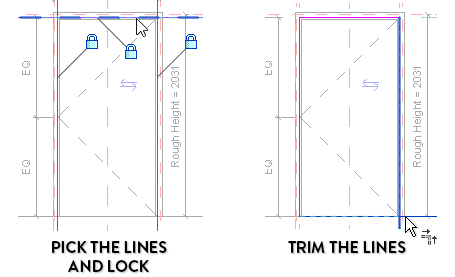
image © RevitPure
Then, assign the door thickness in plan view. Create a new reference plane and assign a “Thickness” dimension. Align the door panel to the new reference plane and lock.

image © RevitPure
4. Set up the “Rough” Dimensions
Sometimes, you might want to know the total wall opening dimension, which might be different from the door panel when you include the frame. That is when the Rough Width and Rough Height dimensions become useful.
Usually, the rough dimensions are found by adding the door Height and Width to the frame thickness. You might also want to subtract a value to account for the overlap between the frame and the wall. In the example below, we created a formula to automatically calculate Rough Width and Rough Height values. We consider there is an wall/frame overlap of 19mm. If you modify the Frame Thickness, the Height or the Width, the rough dimensions will automatically be updated.

image © RevitPure
The door Opening Cut is usually created in relation to the rough dimensions. In a the door elevation, make sure to lock the Opening Cut to reference planes that are associated to the “Rough Width” and “Rough Height”

image © RevitPure
5. Use Sweep to Create Door Frame
Unless you want a square frame, you should use the Sweep tool to create the door frame. Go to the elevation. Use the sweep tool and select “Pick Path”. Click on the 3 edges of the door Opening Cut.

image © RevitPure
Now, click on Edit Profile. Go to a plan view. Draw the profile of the frame. Make sure to lock all the important dimensions. If you want to customize the frame thickness, you can add a reference plane and assign a new dimension parameter.

image © RevitPure
Click the green check to complete. Try to modify the door width and the default wall thickness to make sure the frame sweep is properly working and adapting to different dimensions.
6. Make Door 3D Geometry Invisible in Plan View
The door frame and panel we’ve just modeled are useful for 3D views and elevations, but they should be made invisible in plan view. Instead, you can use masking regions and symbolic lines to properly represent the door. Select both the door and the frame. In the instance properties, click on Visibility / Graphics Override. Uncheck the visibility for Plan/RCP and When cut in Plan/RCP.

image © RevitPure
In the image below, we draw a masking region to represent the door frame. The masking region boundary lines are aligned and locked to the correct reference planes.

image © RevitPure
7. Create a Nested Plan Swing Family
The 2D representation of the door swing in a plan view should be created in a separate, nested door family. This family can be customized to create a swing angle and add different line style depending on phasing. Creating this family can be a little complicated. To learn how to do it, make sure to check out our free Pamphlet PDF about doors that you can download at the bottom of this page.

image © RevitPure
8. Add External Families for Hardware
To add realism to 3D views and renderings, it can be a smart move to add handles and hinges to your door family. Use external families instead of modeling them directly in the main door family. This way, you can use the same hardware in multiple families.

image © RevitPure
9. Assign All Geometry and Lines to the Correct Subcategory
To properly control the visibility and graphics of each door component, you need to assign the correct subcategories. A family is much easier to control if all elements are in the correct category. Once loaded in a project, a subcategory visibility can be turned off or the graphics can be overridden to a certain style.
In the example below, the door frame is selected and assigned to the Frame/Mullion subcategory in the instance properties.

image © RevitPure
10. Assign Material Parameters to 3D Geometry
You need to create new material parameters for the door frame, panel, the nested families and any other components.
Click on the door panel. In the instance properties, click on the small rectangle. Create a new parameter called “Panel Material”. You’ll be able to assign a material once inside a project. Repeat the same step for the frame and create a “Frame Material”.

image © RevitPure
11. Avoid Door Super-Families
If you download door families on random BIM and vendor websites, you are likely to get garbage, over-modeled super-families. A “super-family” means that there is a lot of customization options that can be activated by checking some parameters. The problem is that these families are often very heavy and will slow down your model performance. They also have a ton of parameters that will poison your model.

image © RevitPure
Instead of using these behemoths, create multiple small and efficient door families. The default Autodesk door families are a good starting point for beginners.
12. Create a Custom Door Family Template
If you are going to create multiple similar door families, it might be a good idea to create a custom family template. Create all the basic common parameters, reference planes and geometry. Then, save the family and rename the extension from .rfa to .rft. Every time you create a new door family, use this custom family template.
Did you like this post? You are in for a treat. We’ve just released our most epic seasonal pamphlet so far. You will learn all the complete steps to create a door family. You will learn how to create plan swing family. Finally, you will learn how to create different line styles in a plan swing to represent a door phasing.
This article was originally published on RevitPure’s blog and has been republished here with permission.

cover image © unsplash


