
13 Tips to Master Balusters in Revit

image © RevitPure
Balusters in Revit are complicated to understand. This guide aims to explain them in the most simple way. Check out the Revit Pure Live episode that covers the topics as a companion to this blog post:
1. Understand the Difference Between Balusters and Posts


Balusters
Vertical elements that are part of the railing. Set their shape with Baluster Family. Adjust their spacing in Baluster Placement.
Posts
Posts are balusters that are at the Start, the End or the Corner of a railing. They can be added in Baluster Placement.
Baluster Family
Balusters are made from a full 3D Revit family. These families are made so the baluster can be cut diagonally to match slopes in the railing.
Post Family
While baluster families can be used to create posts, usually they aren’t cut diagonally and might extend beyond the top rail height.
2. Learning How to Use the Balusters Menu
The balusters menu allows you to create a balusters pattern. In this example, we have balusters with the Distance From Previous set to 100mm. In the second example, we add a second baluster by clicking on the “Duplicate” button. We set the Distance From Previous to 125mm.
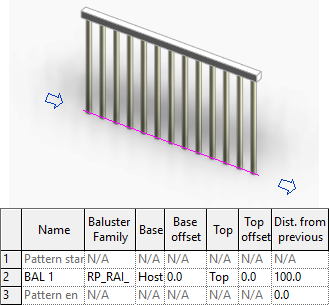
image © RevitPure

image © RevitPure
As you can see here, we now have two types of balusters, each with a different Distance From Previous.
3. How to Align Different Balusters Vertically
Time to understand the Base and Top constraint. Let’s add an intermediate rail to have fun with our railings. Next page, you can see an image where we have a railing with a Distance From Previous of 0. That allows us to insert two different types of balusters that are vertically aligned.

image © RevitPure
As you can see, setting a Distance From Previous of 0 to the second baluster allows us to vertically align 2 different baluster types. In this case, the Top of the first baluster and the Base of the second one both are the Intermediate rail.
4. Set Base and Top Offsets
In the example below, we mess a bit with the Base/Top offset values of the balusters. You can see what happens.

image © RevitPure
5. Spread Pattern to Fit is Usually the Best Justification Option
There are four different justification settings available for balusters. When using Spread Pattern To Fit, the Distance From Previous value will represent the minimum spacing. Revit will then adjust the dimension to fit the length of the railing. Spread Pattern To Fit is usually the best option.

image © RevitPure
6. Understand the “Use Balusters Per Tread on Stairs”
When the “Use Balusters Per Tread On Stairs” box is checked, the balusters “Main Pattern” menu will be completely ignored.
Many users are confused about this feature, so again: the top menu becomes completely irrelevant when the box is checked.

image © RevitPure
Once the “Use Baluster Per Tread On Stairs” box is checked, you only have to set 2 parameters: Balusters Per Tread and Baluster Family.
You only need to specify a baluster type and how many balusters to be placed on each tread. The bottom of the balusters will match the host element (either the treads or support). The top of the balusters will be the top rail. In the example below, you can see what happens when you switch the number of balusters per tread.

image © RevitPure

image © RevitPure
7. Learn the Effect of “Use Balusters Per Tread on Stairs” Beyond Stairs
When creating a railing that is partly on a stairs but that extend beyond the stairs to a landing or a floor, the same balusters will be used, with the same spacing used on the stairs.
Basically, the “Main Pattern” of balusters will be ignored for the entire railing, even on segments beyond the stairs.
In the example below, you can see that the balusters distance from one another will be automatically adjusted to match the Actual Tread Depth.

image © RevitPure
8. Be Mindful of the Balusters Glitch
If you have balusters that go beyond the stairs, you might have a glitch like in the image below. Sadly, there isn’t any easy way to solve the issue for the moment.

image © RevitPure
9. Setting Offset Values to Balusters
The offset value is used to control the distance from the balusters to the center of the railing path. A positive value will move the balusters to the left side, while a negative value will move them to the right side. You can understand the direction of the railing and which way are the right/left sides by looking at the direction arrows.

image © RevitPure
10. Setting Offsets Values to Balusters (on Stairs)
In the previous page, we mentioned that a positive offset value moves the elements to the left side. The process is a little different when railings are hosted on stairs. A positive offset value goes to the exterior side of the stairs while a negative offset value goes to the interior side of the stairs.
Watched out though: If the “Use Baluster Per Tread On Stairs” box is activated, the offset value will be ignored.

image © RevitPure
11. How to Use Posts
Revit allows you to create Beginning, Corner and End posts. The image below explains how to use posts. Look at the arrows to understand the placement of the beginning post.

image © RevitPure
12. Using Space Value on Posts
When creating posts, you have access to an additional parameter called Space. When the value is set to 0, the post will be centered on the extremity of the purple boundary line. A positive value will move the post towards the start of the railing (represented by the beginning blue arrow).
Usually, the Space value is equal to half the width of the post. A negative value is used at the start post and a positive value at the end post.

image © RevitPure
13. Breaking Pattern at and Corner Posts
Just below the balusters Main Pattern menu, you have a dropdown menu called Break Pattern At. The default is usually Each Segment End, which means each purple boundary segment will restart the balusters pattern. You can switch the option to Never if you want the pattern to never be interrupted, even at corners and intersections.

image © RevitPure
Just below the Posts option, you can also select in which case you want to use the Corner Post feature. If the pattern is set to break at Each Segment End, you can also set a corner post at each segment end.

image © RevitPure
When the pattern is set to break at Each Segment End, you can split the purple boundary line of the railing to add Corner Posts at the positions of your choice.

image © RevitPure
The Angles Greater Than option allows you to create a minimum angle required between segments for the pattern to break and for a corner post to be added.

image © RevitPure
Would you like to create an amazing baluster family like in this image? Check out our brand new and free Revit Pure Pamphlet about railings. It contains this entire blog post in a PDF format plus the instructions you need to model a classical baluster family. Enjoy :)
This article was originally published on RevitPure’s blog and has been republished here with permission.

cover image © unsplash


