Editor’s note: This post was originally published on BIMSCAPE's blog and re-published here with permission.
In this Autodesk Revit tutorial I am going to show you how to Select and Filter elements. These are skills that you will need many times in your daily use of Revit. You may wish the video version of this tutorial first
We will start this tutorial with Selection techniques and then move onto “Filtering” later. There are 3 main reasons why you will need to select elements: To Move them, to Edit them or to Delete them. If you need to select just a single element, the quickest way is (usually) just click directly on it. More often that not you need to select more than one element at a time. This is where Selection Fences come into play. There are two sorts of Selection Fence- “Enclosed” and “Crossing”- I am going to show you how to create both and the differences between them. Let’s start with an “Enclosed” selection fence. You can see in the image below that I have 3 elements in my model- 2 Walls instances and 1 Desk
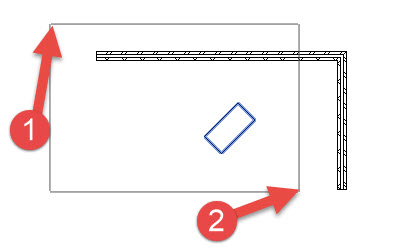
With no tool selected I am going to click my cursor at point (1) and (holding my mouse button down) move it to point (2). Note that a dynamic selection rectangle appears and spans between the two points. An “Enclosed” selection fence is ALWAYS drawn by starting in the TOP LEFT and moving to BOTTOM RIGHT. Now here is the crucial bit: Any element WHOLLY enclosed within this fence will be selected. Note (in the image above) how the desk WILL be selected but the horizontal wall element will NOT- because it is NOT wholly enclosed by the rectangle.
So let’s now look at a “Crossing” selection fence. I have produced one in the image below. They are created by drawing from LOWER RIGHT (1) to UPPER LEFT (2)- i.e. the exact opposite of what we did previously. Notice how any element that is PARTIALLY inside the rectangle will be selected. Also note how the selection rectangle itself is drawn in a dashed line to show you that it is a “Crossing” fence

Using either of the 2 selection fence methods above, go ahead and select all three elements in the model. With all the elements selected take a look over at the Properties Palette. Notice how (near the top) Revit tells us how many elements are currently selected. It displays the word “Common” to tell us that ONLY the Properties that are COMMON to all three elements are currently displayed in the Properties Palette:

If you click on this drop-down (see the image above) you can drill down to certain categories of elements (Such as just “Walls”) if you need to access their specific properties.
Let’s now move on to the “Filter” tool. This tool really does speed up the use of Revit and (consequently) is well worth learning early on in your Revit journey. Lets’ go ahead and select all three elements in the model. As soon as we do so, the “Filter” tool becomes available on the ribbon

It is worth stating that the Filter tool ONLY becomes available when you have at least TWO different categories of Revit element selected at the same time. So if you had 200 Wall instances selected, the Filter tool would NOT be available- as you still only have 1 category (“Walls”) of element selected, regardless of the number if element instances. OK, back to our example:

You can see (in the above image) that Revit has detected the 2 different categories that our 3 elements reside on. Remember we have 2 Wall instances and 1 Desk instance. You can now simply use the tools on this panel to refine your “Selection Set”. For example if we only want the desk to be selected we simply uncheck the “Walls” category:

Now the above is obviously a very simple example. In reality you will be using the “Filter” tool to pick out specific categories in a complex model. For example: You may have a floor plan of a hotel model. It has hundreds of elements spread across many categories. You want to pick out all the Doors so that you can change them to a different type- all in one go. Using the Filter tool this is EASY! Just fence the WHOLE model in your Floor Plan View, hit the “Filter” tool, hit “Check None” to untick ALL the categories and then simply tick the “Doors” category and hit “OK”. Job done: You’re active view now just has EVERY door selected. Now just choose an alternative Door Type from the Properties Palette.
The Filter tool is so useful that it has it’s own permanent icon on the Status Bar, which is located in the bottom-right hand edge of the Revit application window

Note how the number of elements currently selected.filtered is shown next to the icon.
Key Points
Select individual elements by simply clicking on them
Select multiple elements by “fencing” them with a “Selection Fence”
Upper Left to Lower Right selects everything WHOLLY enclosed within the rectangle
Lower Right to Upper Left selects everything that is enclosed or is crossed by the rectangle
Editor’s note: This post was originally published on BIMSCAPE's blog and re-published here with permission.


