14 Tips to Understand Revit Railings
Railings is probably the hardest tool to master in Revit. The menus and multiple sub-types of elements can be confusing. Don't worry, we got you covered. Read these tips to become a Railings warrior. Or watch the video tutorial below if you prefer.
1- CHOOSE BETWEEN SKETCH A PATH OR PLACE ON HOST
When creating a railing, you can pick between of two creation options: Sketch on Path or Place on Host.
SKETCH ON PATH
This option allows you to draw a railing outline any way you wish to. Draw a continuous purple line, then click the green check.

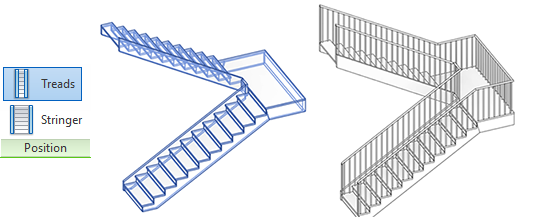
PLACE ON HOST
Choose this option to automatically create the railing based on an existing stair or ramp. Choose placement on treads or stringer.
2- ADJUST "OFFSET FROM PATH"
When adding a railing to stair Treads, the path offset will be set to 25. When adding a railing to Stringer, the path offset will be set half the value of the stringer width. So -25mm for a 50mm stringer. You can change these values at all time by selecting the railing and checking properties.

3- ACTIVATE RAILING PREVIEW
Click the preview icon to show how your railing is going to look like once it is completed. Using a 3D view with preview is the best way to test and adjust your railing.

4- HOST RAILINGS TO SLOPED WALLS AND FLOORS
Revit 2017 added the option to host railings to walls and floors. This means if you create a wall with a slope, the railing will follow the shape. To do this create a railing with “Create Railing Path” option. Then select your railing, click Pick New Host and click the wall or floor. Want to reset the host? Pick New Host and click the empty model space.


5- UNDERSTAND THE ANATOMY AND THE HIERARCHY OF RAILINGS
Before creating a railing type, you need to understand every part of it.

The Railing Type contains everything inside a railing. In each type, you get to select Top Rail, Handrail, Rails and Balusters.

Here is a visual guide to all the parts contained in these types.


6- LEARN WHERE TO FIND EACH RAILING ELEMENTS
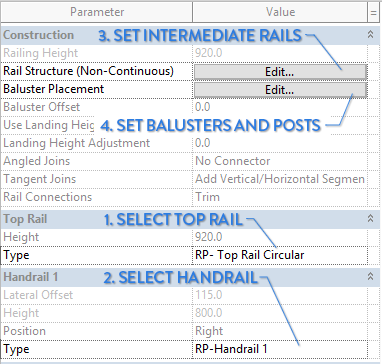
To create a railing type, select and duplicate an existing Railing type. Then follow the steps below.
7- LEARN HOW TO CREATE A TOP RAIL AND HANDRAIL
In Railing Type properties, you can select Top Rail and Handrail types. But before doing so, we must create new types to fit our needs. Use the Project Browser, go to Families. Under Railings, you will find Top Rail Type and Handrail Type. Double-click and duplicate a type to begin.

SELECT PROFILE
Select a 2D profile family. It will be extruded to create your Rail. Use one of Revit default profiles: Round, Elliptical, Square or Rectangular. If you want a more complex shape, you will need a custom profile.

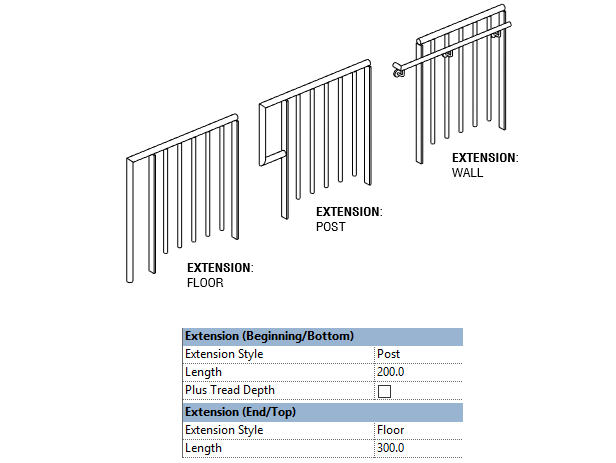
SET EXTENSIONS
Use extension if you want your rail to go beyond the railing limit. Choose between Floor, Post and Wall extension. You can set an extension at the Beginning and End of the railing.
SET HANDRAIL SUPPORTS
Supports are used to connect Handrails to railings or to walls. Adjust Family type, Layout, Spacing and Justification in Handrail type.
The default Revit family is Circular. In the Support Type properties, you
can adjust Radius and Height. If you want a different shape, you will need
to create another Support family.

SET RAILS HEIGHT
The height of Top Rail is set in Railing Type. To change Handrail height, go to Handrail type. Also adjust Hand Clearance, which is the distance between baluster end and the center of the handrail.

8- LEARN HOW TO CREATE INTERMEDIATE RAILS
We already covered how to create Top Rails and Handrails. Each Railing can also contains Intermediate Rails (also known as non-continuous rails). Creating them is pretty simple.
GO TO RAIL STRUCTURE, INSERT NEW RAIL
In the Railing Type, click on Rail Structure (Non-Continuous). Then, click on the Insert button to add a new rail. Give a name to your rail.
SET 2D PROFILE FAMILY, HEIGHT AND OFFSET
Profile for intermediate rails work the same way as profiles for Handrail and Top Rail. Select one of Revit default profile family, or create a custom one for more complexity.
Then, set the rail height and the offset distance to the center of the railing. The rail height can never be higher than the Top Rail. Add a material if you wish to. You are done! Use duplicate to create many intermediate rails.

9- LEARN HOW TO CREATE A BALUSTER PATTERN
GO TO BALUSTER PLACEMENT
In the Railing Type properties, you will find Baluster Placement. In this tab, you select how to configure the balusters. You might be intimidated by the dialog box that appears. No worry, we will make it simple.

SELECT A BALUSTER FAMILY
In the Baluster Family column, pick a Baluster to use. By default, Revit contains Round, Square, Rectangular shapes. If you want a fancier shape, you will have to make a custom family.

SET OFFSET TO RAILING CENTER
Use offset to set a distance between balusters and the purple center line of the railing.
SET BASE AND TOP OF THE BALUSTERS
Select the base and the top of your balusters. Can be either the Host or Rails elements. Then adjust the required offset from these elements.
In the image below, the red dashed line indicate the position of the balusters. You can see that the baluster Base is 100mm from the Host and baluster Top is set to the Top Rail.

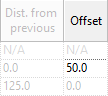
SET DISTANCE FROM PREVIOUS
Distance from Previous is the default distance between each baluster.

SET BALUSTER JUSTIFICATION
Set Justify option to decide how balusters spacing will adjust to railing length. Beginning, End and Center will keep Distance from Previous, while Spread Pattern to Fit will change the value to have an equal spacing.

SELECT POSTS
Posts are special balusters that only appear at the Start and End of a railing. Corner posts are optional. They are used for railing intersection.

10- SHOW PREVIEW IN RAILING TYPE
Not sure how your railing is going to turn out? Use preview in Railing Type properties to get a glimpse of what it will look like. You can select 3D views, plan view or elevations.

11- USE PROJECT BROWSER TO FIND RAILING PARTS
Go to Families in your project browser, then hop to Railings. All Railing Type will be in the Railing sub-menu (in red). The Handrail and Top Rail also have their own submenu (in blue).
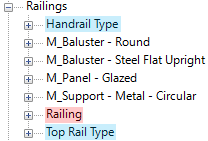
All the others families are directly under the Railings category, including Balusters and Supports. Don’t forget that all rails use a 2D Profile that can be found under the Profiles menu in Families. To save time, use CTRL-F in the project browser and type the name of the component you are looking for.
12- ADJUST TOP RAIL TRANSITIONS
Select a transition style for Handrail and Top Rail. This is how the rail will behave when a sloped railing change direction.

13- USE TAB TO SELECT SPECIFIC RAILING PARTS
If you click on a railing, the whole thing will be selected. But by using tab, you can cycle through different parts of the railing to individually select and modify them. These are the elements that can be selected:

See the pin icon ? Clicking it will break the link between the Railing Type and the specific railing element. That means you can change the Top Rail for a specific instance without affecting other railings using this type.
14- ADJUST SUPPORTS POSITION
Handrail Supports position is automatically set in Handrail Type. Often, this position is not what we want. Tab-select and unpin the support, then move it to the correct position.

Editor’s note: This post was originally published on the Revit Pure blog and re-published here with permission.


