Editor’s note: This post was originally published on BIMSCAPE's blog and re-published here with permission.
In this Autodesk Revit tutorial I give you an introduction to working with Components. You may wish to watch the video version of this tutorial before following the written article.
Before we go any further, let’s discuss exactly what a Revit Component is. Well you’ve come across some already in the form of Doors and Windows. Revit Components are “generally” stand-alone blocks such as tables, chairs, cookers, table lamps, etc. They are distinct Revit Families files in their own right- having a .RFA file extension. They are created by use of the Family Editor and can be loaded into Revit Projects as and when needed. It is good practice to put Components that you use regularly into your office Template file- which has a .RTE file extension.
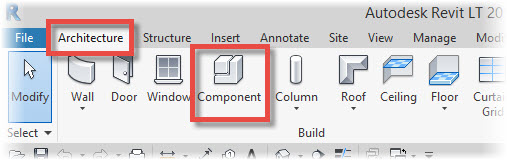
A small number of components are placed into your model by means of their “parent tool”- such as Doors and Windows. But most other Revit Components are placed by means of a single “Component” tool. Let’s take a look at how that works now. Switch to the “Architecture” menu and you will find the “Component” tool located on the “Build” panel:
Go ahead and select the “Component” tool. Immediately the Properties Palette changes to to show the currently selected Component. If you click on the drop-down Type Selector at the top of the Properties Palette, you will see a list of all the Components available to you in your current project. And this list is dependent upon the Components you have in your standard Template, upon which your new Projects are created from. In the image below you can see a few of the Components available such as trees, desks, rainwater pipes, etc. These are all from the standard default Autodesk Revit template.

Next cast your eye on to the Options Bar. Note that you have the option to “Rotate” your Component immediately after you have placed it in the model- without the need for activating the Rotate tool. We’re now going to place a Desk Component into our model and I want to rotate it as soon as it’s placed- so I’m going to go ahead and tick the “Rotate after placement” box:

Next I choose the Component I want from the drop-down Family/Type Selector in the Properties Palette. I am going to choose a Desk Family and the Type will be “1525x762mm”:

I can now click in the active Floor Plan View and place a single instance of this particular Component. Notice how as soon as the Component is placed we get a “Centre of Rotation” (the blue dot in the centre of the desk) and a “Rotation angle” which we can use to lever the object around

Move the cursor to rotate the “Rotation angle” line to the desired angle- or alternatively, simply type in the angle you wish to rotate the component by:

And then click to finalize the position of the new component:

Depending upon which components were contained within your office Template file (.RTE file extension), your choice of components will (by default) generally be quite limited. The vast majority of the time you are going to need to load additional components into your current project. You do this by means of the “Load Family” command. Remember, Components are stand-alone Revit files with a .RFA (Revit Family) file extension. As such, they can be stored as a Library on your PC’s hard drive, office server, cloud storage, etc. When you first install Revit onto your computer you have the option to install a “default component library”. This is basically a range of generic components that Autodesk provide with the software in order to get you started. You can of course adapt these components to suit your own needs, by use of the Family Editor- this is outside the scope of this Beginners’ Course. The “Load Family” button is configured to open a File Browser which immediately points to the default Autodesk Library. Go ahead and hit “Load Family” now:

In the image below you can see that the File Browser open to a folder called “UK”. This is part of the “Metric Library” that was created when I installed Revit. Depending on which country you are in, your File Browser may point to a folder with a different name. However, it’s purpose is exactly the same- and that is to give you access to the generic component library that ship with Revit:

Finally before we finish this tutorial, I just want to talk about “hosted components”. All Revit Components need a reference level in order to locate them vertically in the model- you can think of this as their “Z” coordinate.

The desk we placed earlier is a good example of this. Although we can place the desk anywhere both in plan and section- Revit uses a “Reference Level” to locate it vertically. So in this case- the Level itself acts a Host for the Desk Family. In the image above you can see that the Desk is hosted on “Level 0”. If we go ahead and select the Desk Component, we have an option (on the ribbon menu) to “Pick New Host”:

After I click this tool (i.e. “Pick New Host”), I can then click on a new Host to act as a Reference for my Component. So in the image above, I then click on “Level 1” (3) to act as the new Host.

Revit immediately moves the Desk vertically in the model so that the Desk now references “Level 1”. An example of the use of this tool is if we had accidentally placed the desk on the wrong level. This method negates the need to delete the desk and add it again- we simply re-reference the desk we already have.
Please Note: Some components may use other Revit Families as Hosts. For example, there are “Wall-based Families”, “Face-based Families”, “Ceiling-based Families”, etc. The same “Pick New Host” tool can be used to relocate these components as required.
Key Points
Revit Components are stand-alone Revit Families with a .RFA file extension
Use the “Load Family” tool to bring new Components into your current project as required
Revit Components use References (such as Levels, Walls, geometric faces, Ceilings, etc) to locate them in the model.
Components can be “re-referenced” with the “Pick New Host” tool.
Editor’s note: This post was originally published on BIMSCAPE's blog and re-published here with permission.


