Editor’s note: This post was originally published on the BIMscape blog and re-published here with permission.
In this Autodesk Revit tutorial we are going to take a look at Design Options. If you’d like to watch the video version of this tutorial first, simply click in the box below:
In the course of developing your architectural design is quite common for the need explore different solutions to various aspects of your proposal. Take the following simple building:
Let’s say I want to explore a couple of options with regards the design of a lobby area, at the location defined by the red arrow. Now I could just put in some Revit walls and doors and keep shifting them about until I’m happy. But there is a much more elegant solution to this: Design Options. This tool allows you to create different sub-sets of your model in order to try and test out varying solutions.
Let’s see how this works in practice. Switch to the “Manage” menu (1, below) and choose “Design Options” (2, below):
The “Design Options” panel open
Let’s look (with reference to the image above) at the various areas that make up the “Design Options” panel:-
Option Set: Use this to define the various areas that you are looking at in your overall model, eg “Lobby Options”, “Main Roof Options”, South Elevation Window Options”, etc
Options: Use this to create the individual Options that relate to an “Option Set” eg “Lobby Design 1”, “Lobby Design 2”, etc
New Option Set button: Go ahead and hit this to create a new Option Set for our Lobby area
The first thing I am going to do is “Rename” (1, below) the Option Set to something more meaningful. I am going to call it “Entrance Lobby”. You can see that currently there is a single Option (“Option 1”) contained within this Option Set
Make sure “Option 1” is highlighted (1, below) and then choose “Edit Selected” (2, below)
Note how the rest of the model is now greyed out (2, below) and you are free to start adding elements to this empty Option (1, below)
Now we can add another “Option” to the Set (1, below) , select it and choose “Edit Selected” (2, below)
Notice how the element contained in “Option 1″ are now hidden and we have a blank canvas for ~”Option 2”. We can go ahead and try out a different design:
At some point we will make a decision on which option ww wish to go with. Revit has the ability to incorporate the elements of our chosen option into the main model and then jettison the redundant elements contained in the unused options. Let’s do that now. Let’s say we want to go with “Option 2”. Make sure it is selected (1, below) and choose “Make Primary” (2, below). At any point in time, one of your Options will always be designated the “Primary” (or “preferred”) Option. You MUST make the Option you wish to keep the PRIMARY option before proceeding:
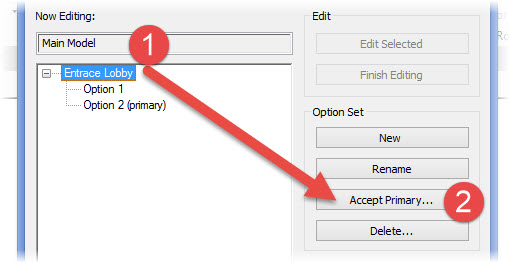
Now select the name of the Option Set- “Entrance Lobby” in our case (1, below) and hit the “Accept Primary” button (2, below):
You will now see a rather stark warning that tells you that Revit is going to incorporate the elements from your preferred (“Primary”) option into the main model and DELETE all other Options- and the Option Set in question.
Go ahead and hit “OK”. In the image below you can see that Revit has:-
Deleted the Options and Option Set
Added the elements that were contained within “Option 2” to the main model. The elements that we created for “Option 1” are no longer in the project.
You can configure individual views to display different Options- do so be accessing the “Design Options” tab in the “Visibility / Graphics Override” panel.
Key Points
Design Options are used to explore and communicate different solutions to parts of your design
You can explore options for different aspects of your design using “Option Sets”
Use the “Accept Primary” function to incorporate your chosen option into the main model
Editor’s note: This post was originally published on the BIMscape blog and re-published here with permission.


