Autodesk Revit: Working with CAD files
Editor’s note: This post was originally published on the BIMscape blog and re-published here with permission.
In this Autodesk Revit tutorial we are going to take a look at Working with CAD Files in your Revit Projects. If you’d like to watch the video version of this tutorial first, simply click in the box below….
Quite often when you start a new project, you have some existing information that you wish to utilise. This may be in the form of a measured survey of an existing building or simply a topographical survey showing the site contours and levels. AutoCAD’s DWG file format is a common file type for this sort of information. We can easily Link to, or Import these files into a new Revit Project and use them as a “starting point” on which to develop our 3D model.
To bring one of these files into Revit, switch to the “Insert” menu (1, above). You now have two main choices: You can LINK the file into the project (2, below) or you can IMPORT it (3, below)…
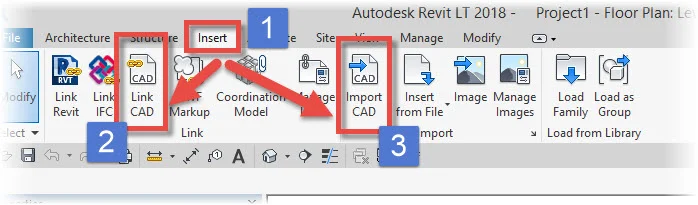
When you LINK a file into your project, any changes to the source DWG file are included in the Revit project next time you open it. You must leave the source file in it’s original location so Revit can find it. This is similar to the XREF function in AutoCAD
When you IMPORT a DWG file- you “embed” it into the Revit project. It now becomes part of the .RVT file. Changes to the source DWG file are NOT updated in the Revit project.
Go ahead and hit the “Import” button. The “Import CAD Formats: dialogue box opens. The main part of this screen is a simple “file picker” and allows you to navigate through to where your DWG file is located…

The lower part of the panel contains a wealth of settings. I am going to run through theses with you now…

Colours: You can choose the to use the colours from the AutoCAD Layers, make them monochrome, etc
Layers/Levels: You can specify which AutoCAD Layers are imported. The default is to bring ALL of them in
Current view only: This will restrict the visibility of the DWG file to just the view you have active at the time of Import
Import Units: Specify the Units of the source file- or let Revit AUTO-Detect them (works “most” of the time!)
Correct Lines that are slightly off axis: UNCHECK this box! Or Revit will straighten lines that it finds slightly off axis
Positioning: Choose how Revit relates the coordinate system of the source file with the Project’s coordinate system
Place at: The DWG comes in as a 3D plane- you choose what level in the model it is placed at
Orient to view: Have the orientation of the DWG 3D plane match that of the view you are importing it in to.
With regards Positioning, your choice here will depend on whether you are working with “real world” coordinates- i.e. as setup by a Land Surveyor, in the DWG file.

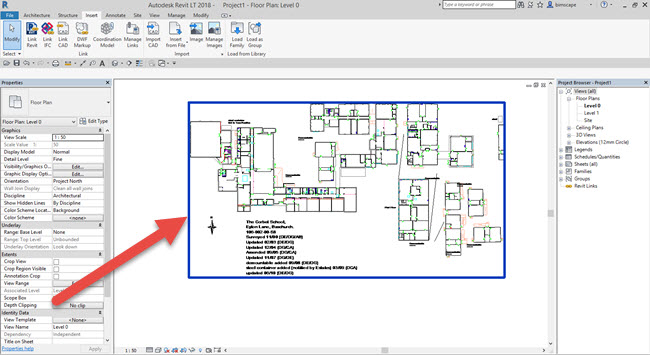
Once you have configured the above settings, hit “OK” to go ahead and import the file. Once imported, the DWG file acts as a single “object”. If you select it, you will see a large blue rectangle around the entire object…
If you select the DWG file, you then have some option available to you on the ribbon menu. You can “Query” any of its Layers- i.e. gather some basic information about the Layer. You can also “Partially” or “Fully” Explode the DWG file. Please Note: When you Explode a DWG file from within Revit, it’s elements are converted to native Revit objects. eg AutoCAD Lines are converted to Revit Lines, Hatched Polygons are converted to Filled Regions, etc.

You can control the visibility of the Imported (or Linked) DWG file on a “per-view” basis. As soon as you LINK or IMPORT a DWG file into your Revit project, you will find an additional tab (1, below) in your “Visibility / Graphic Overrides” panel….
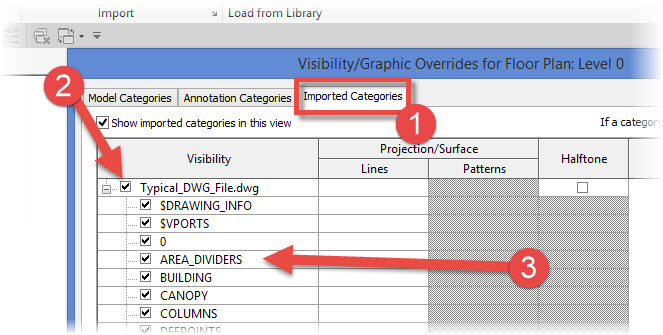
You can click on the small cross next to the file’s name (2, above) in order to expand the list of Layers contained within the DWG. Select an individual Layer name in order apply graphic overrides to it’s Lines.
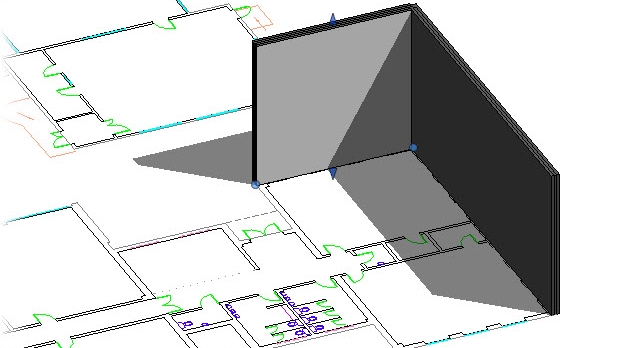
So what can we do with a DWG file once it is imported into a Revit project. One common is to use it as a “base template” on which to start constructing your 3D model. For example, Activate the “Walls” tool and select “Pick Lines” (1, below) from the Draw Palette…

You can now simply click on the lines in the DWG file that represent walls; and Revit will create actual Wall elements in those locations. Below is an image of a model I am starting to create, using that process…..

Many companies have a lot of legacy information stored as DWG files. Don’t reinvent the wheel when you can easily utilise that existing information within a new Revit project
Key Points
DWG files can be utilised within Revit projects
You can either LINK to them or IMPORT them
Carefully consider the settings available to you at the time of LINKING or IMPORTING
Don’t let Revit mess with DWG lines that are “slightly off axis”!


