
Revit Architecture: Doors and Windows Tutorial
Editor’s note: This post was originally published on BIMSCAPE's blog and re-published here with permission.
For the vast majority of the time the openings that are created in Walls are part of a Door or Window assembly. In Revit, we have dedicated tools for creating Doors and Windows respectively. In their actual operation, both tools are nearly identical. The only difference being the category of object that they create- hence me covering the use of both tools in the same tutorial.
Unit Agenda
Learn to place Revit Doors and you’ll know how to place Windows!
Revit Doors and Windows are Hosted Components
Placing a Door or Window into your Model
Changing the orientation of your door or window
Door and Window numbering
Creating additional Door and Window Types
Loading additional Door and Window Families into your Project
Learn how to place Revit Doors and you’ll know how to place Revit Windows!
As stated in the introduction, the Door and Window tools in Revit work in an identical manner- so learn one of them and you instantly know the other! For the purpose of this tutorial I have chosen Doors in order to show you how the tool works. So just work your way through the use of the Door tool and then have a go with the Window tool.
Revit Doors and Windows are Hosted Components

Revit Door and Window objects are what we call “Hosted Components” (or “Hosted Families”). They are called “Hosted” because they necessarily require a host component in/on which to exist. If you try to place a Revit Door in “free space” you will get an Error sign- and that’s because it needs a Host in which to embed itself. The fantastic thing about Hosted Families is that once they are created in/on their Host- they stay attached to that Host even if it moves. For example, you create a Door in a Wall. You then decide to change the location / rotation the Wall element- the Door stays with it.
Placing a Door or Window into your Model

To place a Door or Window into your model, find the respective tool on the Architecture menu / “Build” panel- see the image above. As stated above, just ensure you already have a Wall in your model- so you have something to receive the hosted family.

As soon as you select the Door (or Window) tool, you will see the Options Bar change accordingly- see the above image. You have some Options as to the placement, type and orientation of any associated Tags. Don’t worry too much at this stage about Tags- I’ll be covering them in a dedicated tutorial later on in the course.

With the Door (or Window) tool selected you can simply hover over a section of wall and click to place a component. Just notice how there is a “No Entry” symbol displayed if your cursor isn’t over an appropriate Host (a wall element in the case of Doors and Windows). Go ahead an place a couple of Doors into your model.
Changing the orientation of your door or window

Once you placed a Door into your model, cancel out of the Door tool- either by hitting “Escape” on your keyboard or the “Modify” button on the far left hand side of the menu. No go ahead and select one of the Doors you have just placed. Just take a few moments to examine the component. Notice the 2 “arrow” symbols close to the door- see the image above. These “toggles” allow you to “hand” (or “flip”) the door over- both in terms of which side the hinge / leading edge is; and also whether it opens into or out of a room. So if you have found that you originally placed the door in the wrong orientation, you do “not” need to delete it and place a new one- just simply select it and use the “flip” toggles to correct the orientation. Note: If the door family you have placed is symmetrical in elevation- you will not have a toggle to swap over the hinges / leading edge- as it wouldn’t actually make any difference. Whether a particular component has these toggles is down to the person that has “authored” (or created) them using the “Family Editor”
Door and window numbering

If (at the time of placement) you chose to “Tag on Placement”, Revit will create an associated annotation family (A “Tag” in this case) and placed it close to the Door (or Window) family. In the above image you can see the Door in the wall and in the centre of the Door is a “Door Tag”- This one is displaying the number 3. The actual value (“3” in this case) is stored in a parameter associated with the Door family. The Tag simply takes the value of that instance parameter and displays it on your View. As stated above- MUCH more on Tags later on in the course.

If you need to change the value of a particular Door (or Window) number, simply select the Tag (NOT the Door or Window family itself) and then click on the current value. This makes the Tag box editable. You can simply replace the current value with a new one. Note: Each Door or Window number must be “unique” in your current Project. Alternatively: You can select the Door (or Window) family itself and change the number in the Properties Palette. When you “Apply” the change to the Properties Palette, the Tag updates accordingly- after all, it is simply displaying the value of the Instance Parameter.
Creating additional Door and Window Types

If you need to create a new / additional “Type” of Door (or Window) component in your project, simply select a Family that you need a new Type for- and then hit “Edit Type” and then “Duplicate“. Give the new Type a unique name- and you are then free to change any of it’s Type parameters. Please Note: Your new Type only exists within this particular Revit Project. If you’d like a new Type to be available for all new Projects, you need to open up your office Revit Template file (.RTE file extension) and create the new Type within there.
Loading additional Door and Window Families into your Project
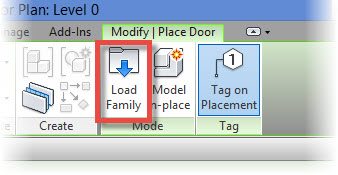
Depending on your office template file, you will typically only have a handful of Door and Windows families available to you within your current project. There will be many occasions where you need to load additional components into your Project. With the Door (or Window) tool selected, take a look at the right hand side of the ribbon menu. You’ll see a button named “Load Family”. Go ahead and click on this. A File Browser window will open- and it should be configured to open with the standard library folder for Doors (or Windows- if you accessed it via the Window tool). From here you can load any of the additional components that ship with Revit Architecture.
Key Points
Doors and Windows (in Revit) are examples of Hosted Components
The Door and Window tools are identical in their operation- they just differ in the Category of object that they place
New “Types” can be created directly within the Project environment.
Additional Door and Window components can be loaded into your Project using the “Load Family” command.
Editor’s note: This post was originally published on BIMSCAPE's blog and re-published here with permission.
cover photo © unsplash