Editor’s note: This post was originally published on RevitIQ's blog and re-published here with permission.
REVIT KEYBOARD SHORTCUTS
To be a good draftsperson, you need to be efficient. You need to be able to produce models & documentation accurately – and as fast as possible! One way to achieve this in Revit is to use Keyboard shortcuts. Let’s learn how:
First we need to find the User Interface options. There’s two ways to do this:
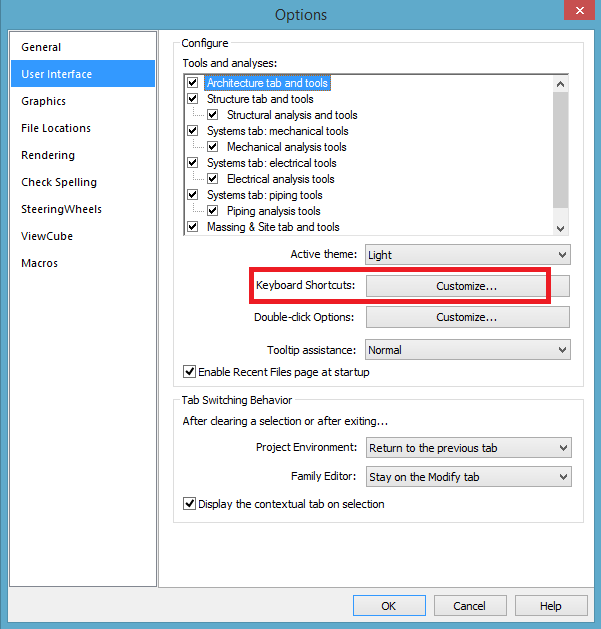
First we can Click on the big “R” and click ‘Options’ . Under the User Interface tab, you can see the keyboard shortcuts option and click ‘customize’.
The second option is via the View tab, in the Project environment. Click on the User Interface button and select Keyboard shortcuts from the dropdown list.
From here you can assign any Keyboard shortcut to any command you want. This makes things waaayyfaster and easier for you instead of selecting the command manually. The best way to decide which shortchuts to assign (or learn) is to take notice of your most common/repetitive commands. If you find yourself wasting time clicking through tabs to find a command, just assign a shortcut to it! It will make your life much easier, plus you look like a Pro to everyone else in the office
The commands I use often and shortkey the most are:
Text (TX), aligned dimensions (DI), Tile Windows (WT), Walls (WA), Beams (BM), Columns (CL), Visibility Graphics (VG), Beam systems (BS), Thin Lines (TL), Tag by category (TG) – The list goes on, I could find shortcuts for everything!
Autodesk has compiled a Revit Shortcuts Guide to the built-in stock standard shortkeys available, but you can assign any shortcut to any command – Do what feels comfortable for you.
On top of that, you can also Import and export your shortcuts as a .xml file. That way, when you update to a later version of Revit (for example), you can easily import and begin using your well learned Revit keyboard shortcuts again.
Editor’s note: This post was originally published on RevitIQ's blog and re-published here with permission.


